Monday, February 14, 2011

High Volt LED Flasher


Here is a Flasher circuit that directly derives power from AC to give brilliant flashes at the rate of one flash per second. It uses a Diac as the main element to flash the LED through current pulses.

230 Volt AC is reduced to 50 volt DC by the dropping capacitor C1 and is rectified by the full wave bridge D1 through D4.Resistor R1 removes stored current from C1 when the circuit is unplugged and resistor R2 protect the circuit from inrush current.

The main element in the circuit is the Diac DB3.It is a semiconductor device that acts as a Voltage-Controlled switch. If a low voltage is applied to the Diac, it remains as an open switch passing little current. All diacs have a break down voltage VBO which is between 28 volts and 36 volts. If the applied voltage is above the minimum VBO, the Diac enters into the” Negative Resistance” region and heavy current passes through it. Diacs are commonly used in pulse generator circuits for driving SCRs and Triacs.

In the circuit, Diac forms a Relaxation Oscillator along with capacitor C2.When the capacitor C2 gets current, it charges slowly through R3.When the voltage in C2 increases above the VBO of Diac( 28 V), Diac conducts and current passes through the LED and it turns on. At the same time C2 discharges and the Diac becomes non conducting. Again C2 charges and the process repeat. This gives brilliant flashes at the rate of one per second.


Values of R3 and C2 determine the flash rate. With 100K resistor and 22 uF capacitor, the frequency will be around 1Hz. Value of the LED current limiter R4 is also important to determine the flash rate. Higher value above 220 Ohms will reduce the flash rate since the capacitor takes more time to discharge.If the current through LED is too high, increase the value of R4 to 1.5 K and adjust the flash rate by reducing the value of R3.

Caution: This circuit is extremely dangerous because there is no galvanic isolation from mains. Most nodes are at mains lethal potential and hence dangerous. Do not try to construct this circuit, if you have no experience in handling high voltage circuits.

Read more: http://electroschematics.com/5698/high-volt-led-flasher/#ixzz1DzQNjMPy

LED flasher Circuit


Running an LED off just 3 volts to make a Flasher unit

This circuit uses the TLC555CP timer I.C. to flash an LED roughly twice every second. This particular type of 555 timer will run off only 3 volts so two 1.5 volt cells can be used. With "AA" cells, you can expect a battery life of up to 6 months. With larger "C" or "D" type cells it will last for years.

The circuit can be incorporated into a roadside lane marker bollard or used as a warning for other obstacles such as fences, scaffolding tubes or parked vehicles. It can also be suspended from light switch pull-cords to make them easy to find in the dark.

ALTERNATING LED FLASHER


The alternating LED flasher is simply a two-transistor oscillator with LEDs connected to the collector of each transistor, so that they light in time with the circuits oscillations.

Figure 1 schematic of Alternating LED Flasher

1.5V LED flasher


The circuit to light LED with single 1.5V battery is usually based on a blocking oscillator or a charge-pumped voltage doubler.
This is another (but similar to charge pump) way to flash LED with 1.5V battery. The base-R voltage becomes nearly double the Vcc while making oscillation timing of astable multivibrator. LED can be flashed if it is attached aside. Since the LED discharges the C electricity, oscillator timing is shortened.


Figure 1:  1.5V LED flasher

        Normal astable multivibrator ( without LED )

        LED attatched timing

        LED discharged electricity


Figure 2:  LTspice simulation

You can see the light at the marked points.


Figure 3:  Implementation

--

The circuit above is not enough to light blue or white LEDs which need more than 3V voltage. This version boosts the voltage by a charge-pump extension. It produces about 2.8V momentary, with 0.8 sec intervals. Try other LEDs if the lighting is dim, since some LEDs may require the higher voltage.

Figure 4:  1.5V flasher for Blue/White LED

.

The V(vl) is the LED's cathode voltage, and the V(vh) is the anode.

Figure 5:  LTspice simulation (blue/white)

.

Figure 6:  Implementation (blue/white)

LED Flasher discrete components


PARTS LIST
9 Volt Battery
LED1 - Light emitting diode
LED2 - Light emitting diode
Q1 + Q2 - 2N3904
R1 + R3 - 470k
R2 + R4 - 39k
C1 to C4 - 4.7uf
LED's can be any color

Programmable LED Flashers

Circuit diagram #1:

Programmable LED Flasher #1

Parts:
R1______________10K  1/4W Resistor
R2_______________1M 1/4W Resistor
R3_______________1K 1/4W Resistor (See Notes)

C1_______________4µ7 25V Electrolytic Capacitor
C2______________10nF 63V Polyester Capacitor

D1___________1N4148 75V 150mA Diode
D2______________LED (Any dimension, shape or color)

IC1____________4060 14 stage ripple counter and oscillator IC

P1_____________SPST Pushbutton
SW1____________SPST Toggle or Slider Switch

B1______________3V to 15V Battery or dc power source (See Notes)


Circuit diagram #2:

Programmable LED Flasher #2

Parts:

R1_____________100K  1/4W Resistor
R2_______________1K 1/4W Resistor (See Notes)
R3______________10K 1/4W Resistor

C1,C2____________4µ7 25V Electrolytic Capacitors

D1___________1N4148 75V 150mA Diode
D2______________LED (Any dimension, shape or color)

IC1____________7555 or TS555CN CMos Timer IC
IC3____________4017 Decade counter with 10 decoded outputs IC

SW1____________1 pole 9 ways Rotary Switch (Optional)
SW2____________SPST Toggle or Slider Switch

B1______________3V to 15V Battery or dc power source (See Notes)


Comments:

These circuits were designed on request. Both feature a flashing LED that, after a preset number of flashes will illuminate steadily until P1 (Reset) will be pressed.

Circuit #1 uses only one chip and can be useful if a not very precise number of flashes of the LED is needed before reverting to the steady-on state. In fact, connecting D1 Anode to different output pins of the IC, the steady-on state of the LED will be obtained after 2, 4, 8, 16 flashes and so on.


Connecting D1 Anode as shown, the LED will start flashing at about two times per second after power-on and will revert to the steady state after 8 flashes. P1 resets the circuit and C1 automatically resets IC at power-on.Connecting D1 Anode to pin #13 of IC1 the flashes will be 4; to pin #1 will be 16 etc.The flashing frequency of the LED can be varied by changing the values of R2 and/or C2.


Circuit #2 is more precise and uses about the same parts count of Circuit #1, though requiring two ICs. By choosing the appropriate output pin of IC2, the steady-on state of the LED will be obtained after 1 to 9 flashes, as shown in the drawing at SW1 pins. This switch is optional, as D1 Anode can be hard wired directly to the required output pin of IC2. P1 will work as in Circuit #1 but with some difference: after a momentarily press the LED will restart to flash, but the total number of flashes will be one less than obtained after power-on. Furthermore, if P1 is closed permanently, the circuit will flash permanently.
The flashing frequency of the LED can be varied by changing R1 and/or C1 values.


Notes:


  • Circuits were tested at 9V supply, but they might work in the 3 - 15V dc supply range.


  • The LED current limiting resistor value was calculated for 9 - 12V supply and should be changed to suit different supply voltages.

Dual LED Flasher by 2N2907


This circuit calls more Free Running Multivibrator work resemble Flip Flop. Which encourage itself repeatedly. The Q1 and Q2 be Transistor PNP be usable general (2N3906,2N2907, etc.) The R1 and R2 limit current that flow through LED the bilateral. If enhance the value C1 and C2 the rate something Flasher slow down. Request friends have fun LED Flasher , this please sir.

4011 Dual Led flasher


4011 Dual Led flasher

This simple circuit uses NAND Gates to alternately flash two led’s. The two 47uF capacitors determine the flash frequency. It is a good idea to use a decoupling capacitor across the power supply. I made this circuit using the components shown and it worked fine. The IC that I used is the 4011 Quad
2-input NAND Gate.

Source:http://www.geocities.com/electronics3456/4011.html

Low volt LED Flasher


This entry was posted on Monday, June 2nd, 2008 at 10:25 am and is filed under LED Flasher.

In the circuit diagram for the Joule Thief, the common point of the toroid is the connection at the top of the hand-wound ferrite toroid, in the upper right of the diagram. This goes to the positive end of the battery. The other two wires from the toroid go to the resistor and to the intersection of the transistor with the LED.

One other detail that you may need to know is the symbol and pinout of the 2N3904 transistor. In the symbol, the part with the arrow is the “emitter”, the “collector” is the end above it, that also connects to the LED, and the “base” is the wire leading off to the left, between the collector and emitter. (Also remember that the end of the LED with the flat side and short lead is the end that has the flat bar in the diagram.)

Read More Source:

http://www.evilmadscientist.com/article.php/joulethief

1.5V LED FLasher Using 3 Transistors


LED flasher circuit here will flash a LED using only 1.5 volts  supply voltage. Normally, to make any LED lamp works, you need more than 2 volts power supply. This because LED will work only when the supply voltage is higher than its forward bias voltage, around 2 volts  for red LED, and slightly lower for other color (but still higher than 1.5V).  Using this LED flasher circuit, you can blink a LED with only single 1.5V cell battery. Here is the schematic diagram of the circuit:

low voltage transistors led flasher circuit schematic

This LED flasher works using capacitor charge pump principle. The final LED driver is 2N3904 transistor connected to a 330 ohm resistor and 220uF capacitor.  When this transistor is switched off, the capacitor is charged through two 330 resistors, and when the transistor is swithed on, the capacitor will be discharged through the LED , the transistor and the power supply. At the point of view of the LED, the voltage of capacitor and the power supply is added when trying to flow through the LED, so the peak voltage when the LED is triggered is around 3 volts (but this won’t be observed since the LED will drop this voltage to its forward bias voltage value).

LED Flasher Using 555 IC


This LED flasher give similar circuit with the previous transistor LED flasher, but this circuit use a 555  integrated circuit chip as the active component. Here is the schematic diagram of the LED flasher circuit:

led flasher 555 circuit schematic

This circuit gives alternating LED flashing, but with different flashing period between LED 1 and LED 2. The ON period of the LED 1 is proportional to the R2 value, and the ON period of the LED 2 is proportional to R1 + R2 value. If you use a 1M variable resitor in series with a 22k resitor to replace R1, then you get a variable period flasher. The power consumption will be much lower if you use only LED 1 (remove the LED 2 and R4), and choose R2 value to be much lower than R1. This would give you a strobe effect since the ON period will be much shorter than the OFF period.

LED–LDR Blinker


It normally takes two transistors to build a blinker circuit (in order to make positive feedback possible). However, you can also use a photo-resistor (LDR) that is illuminated by an LED. The feedback takes place here by means of light rays. The circuit is easy to understand. When light falls on the LDR, the current increases. The capacitor then charges, and this increases the base current. This causes the transistor to switch the LED fully on. The stable ‘on’ state switches to the ‘off ’ state as soon as the capacitor is fully charged. The LED is then completely off, the base voltage goes negative and the transistor is cut off.
LED–LDR Blinker Circuit DIagram

The circuit cannot switch back to the ‘on’ state until the capacitor has been discharged via the base resistor. The circuit naturally reacts to external light sources as well. You will have to test it in different light environments to see whether it will work. In any case, it will not work in full sunlight. With an ultra-bright LED and a very low-resistance LDR, it might be possible to build a blinker without using a transistor. The combination of the LED and the LDR would have to provide the gain that is needed to produce oscillations.

Line Powered White LED Array


There has been a lot of excitement lately in the lighting industry.  Some companies are beginning to manufacture general lighting fixtures, which replace incandescent and fluorescent lamps, using LED lights.  When proper heat management is designed into the light fixtures, these LED lights can produce more light with less electricity and last much longer than other devices.  They can also operate well in cold temperatures.  Some of these new lighting fixture designs use a large number of white LEDs, wired into long series wired string arrays.  The circuit below is designed to provide a regulated DC voltage for these strings. 

Examples of LED Lights Using an Array of Small Devices


The circuit begins operation by first rectifying the AC voltage with a bridge rectifier. The pulsating DC output of the rectifier is fed to a switch circuit. This circuit operates as an intelligent voltage switch.  The NPN transistor Q1 in concert with the n-channel MOSFET Q2, routes a specific peak voltage to the storage capacitor C2.  The voltage is selected to be 5 to 7 volts higher then the total forward voltage of the LED series string.  The capacitor C2 should be sized based on the rule of thumb of 4000uF per amp of current.  If the LED string requires 20ma of current, the capacitor should be at least 80uF.  Select the voltage rating of the capacitor to be higher than the peak voltage.  I would also suggest using a quality capacitor with a 105C temperature rating.

A 15v zener diode limits the voltage to the gate of the n-channel FET Q2 and also limits the voltage across the transistor Q1.  This circuit will also operate with 240vac power lines, however, the transistor Q2 should be one with a 400v rating.  The circuit works best when the LED array voltage is above 30v and the total current does not exceed 1/2 amp.

Click on Drawing Below to view PDF version of Schematic

AC Line Powered 40 While LED Series String Driver designed by Dave Johnson

White LED Lamp


Nowadays you can buy white LEDs, which emit quite a bit of light. They are so bright that you shouldn’t look directly at them. They are still expensive, but that is bound to change. You can make a very good solid-state pocket torch using a few of these white LEDs. The simplest approach is naturally to use a separate series resistor for each LED, which has an operating voltage of around 3.5 V at 20 mA. Depending on the value of the supply voltage, quite a bit of power will be lost in the resistors. The converter shown here generates a voltage that is high enough to allow ten LEDs to be connected in series. In addition, this converter supplies a constant current instead of a constant voltage.

A resistor in series with the LEDs produces a voltage drop that depends on the current through the LEDs. This voltage is compared inside the IC to a 1.25-V reference value, and the current is held constant at 18.4 mA (1.25 V ÷ 68 Ω). The IC used here is one of a series of National Semiconductor ‘simple switchers’. The value of the inductor is not critical; it can vary by plus or minus 50 percent. The black Newport coil, 220 µH at 3.5 A (1422435), is a good choice. Almost any type of Schottky diode can also be used, as long as it can handle at least 1A at 50V. The zener diodes are not actually necessary, but they are added to protect the IC. If the LED chain is opened during experiments, the voltage can rise to a value that the IC will not appreciate.
Resistors:
R1 = 1kΩ2
R2 = 68Ω
Capacitors:
C1 = 100µF 16V radial
C2 = 680nF
C3 = 100µF 63V radial
Inductors:
L1 = 200µH 1A
Semiconductors:
D1 = Schottky diode type PBYR745 or equivalent
D2-D5 = zener diode 10V, 0.4W
D6-D15 = white LED
IC1 = LM2585T-ADJ (National Semiconductor)

Mains Powered White LED Lamp


Did it ever occur to you that an array of white LEDs can be used as a small lamp for the living room? If not, read on. LED lamps are available ready-made, look exactly the same as standard halogen lamps and can be fitted in a standard 230-V light fitting. We opened one, and as expected, a capacitor has been used to drop the voltage from 230 V to the voltage suitable for the LEDs. This method is cheaper and smaller compared to using a transformer. The lamp uses only 1 watt and therefore also gives off less light than, say, a 20 W halogen lamp. The light is also somewhat bluer. The circuit operates in the following manner: C1 behaves as a voltage dropping ‘resistor’ and ensures that the current is not too high (about 12 mA).
Mains Operated White LED Lamp Circuit
The bridge rectifier turns the AC voltage into a DC voltage. LEDs can only operate from a DC voltage. They will even fail when the negative voltage is greater then 5 V. The electrolytic capacitor has a double function: it ensures that there is sufficient voltage to light the LEDs when the mains voltage is less than the forward voltage of the LEDs and it takes care of the inrush current peak that occurs when the mains is switched on. This current pulse could otherwise damage the LEDs. Then there is the 560-ohm resistor, it ensures that the current through the LED is more constant and therefore the light output is more uniform.
White LED Lamp Circuit Diagram
There is a voltage drop of 6.7 V across the 560-Ω resistor, that is, 12 mA flows through the LEDs. This is a safe value. The total voltage drop across the LEDs is therefore 15 LEDs times 3 V or about 45 V. The voltage across the electrolytic capacitor is a little more than 52V. To understand how C1 functions, we can calculate the impedance (that is, resistance to AC voltage) as follows: 1/(2π·f·C), or: 1/ (2·3.14·50·220·10-9)= 14k4. When we multiply this with 12 mA, we get a voltage drop across the capacitor of 173 V. This works quite well, since the 173-V capacitor voltage plus the 52-V LED voltage equals 225 V. Close enough to the mains voltage, which is officially 230 V.
Circuit diagram:Mains Powered White LED Lamp Circuit Diagram

Mains Powered White LED Lamp Circuit Diagram

Moreover, the latter calculation is not very accurate because the mains voltage is in practice not quite sinusoidal. Furthermore, the mains voltage from which 50-V DC has been removed is far from sinusoidal. Finally, if you need lots of white LEDs then it is worth considering buying one of these lamps and smashing the bulb with a hammer (with a cloth or bag around the bulb to prevent flying glass!) and salvaging the LEDs from it. This can be much cheaper than buying individual LEDs…

White LED Life Tester Schematic

designed by David Johnson, P.E.

There are lots of white LEDs for sale these days.  Many eBay and electronic component surplus sales claim to sell some very bright devices.  Over the years I have purchased some of them to experiment with.  I also have purchased some products, which contain white LEDs.  A major disappointment for me was some LED night lights I bought from Costco.  In just three months of operation, the night lights I purchased were too dim to be of any use.  What I have discovered is that many of the LEDs start out emitting lots of brilliant white light but quickly fade in just a few months of continuous operation.  I think some manufacturers from China are using inferior phosphors inside the LED assembly, which fatigue after only a few hundred hours.  The light from the better manufacturers seem to last much longer.  But, how do you know if you have some good parts or bad parts?  When new, one part looks as good as another.  What is needed is a way to measure the degradation.  Good parts should show little or no drop in light output as a function of time.  Bad parts might show a 10% reduction in light after only a few days.

I think the tester circuit shown below would work.  It routes an accurate 30ma of current through the LED under test, day and night.  This 30ma current level is a bit more than the standard 20ma, which should accelerate the testing process.  The light emitted by the part is monitored by a small PIN photo diode. The photo diode and the LED under test need to be housed inside a black plastic box.  This insures that light from the environment is not allowed in.  Using a digital multimeter, the current produced by the photo diode can be measured.  The photo diode current is proportional to the light intensity of the LED.  By periodically recording the drop in light output as a function of time, you should be able to flag suppliers of good and bad parts.  Be patient!  It may take a few days or even a week or so to detect a measurable drop in output. 
See schematic below:

Circuit Circuit White LED life tester schematic or circuit

White-LED Driver Provides 64-Step Logarithmic Dimming


Abstract: This circuit drives as many as four white LEDs in parallel from a 3.3V source, and adjusts the total LED current from 1mA to 106mA, in 64 steps of 1dB each.

The circuit of Figure 1 is designed for portable-power applications that require white LEDs with adjustable, logarithmic dimming levels. It drives as many as four white LEDs from a 3.3V source, and adjusts the total LED current from 1mA to 106mA in 64 steps of 1dB each. The driver is a charge pump that mirrors the current ISET (sourced from U3's SET terminal), to produce a current of (215ISET ±3%) through each LED. Internal circuitry maintains the SET terminal at 0.6V.

Figure 1. This circuit provides a logarithmic-dimming capability for white LEDs.

To control the LED brightness, op amp U2 monitors the difference between the high-side voltage and the wiper voltage of digital potentiometer U1. The op amp then multiplies that voltage by a gain to set the maximum output current. Zero resistance at the pot's W1 terminal corresponds to minimum LED current, and therefore minimum brightness. Because the SET voltage is fixed (at 0.6V), any voltage change at the left side of R5 changes ISET, and the resulting change in LED currents changes their brightness level. R5 sets the maximum LED current:

R5 = 215x0.6/ILED(Desired)

where ILED is the current through one LED.

U1 is a digital potentiometer with logarithmic taper and an analog-voltage wiper for which each tap corresponds to 1dB of attenuation between H1 and W1 (pins 11 and 9). It contains two pots controlled by a 16-bit code via a 3-wire serial interface. To set the LED current, drive RST-bar high and clock 16 bits into the D terminal of U1, starting with the LSB. Each pulse at CLK enters a bit into the register.

The circuit uses only one pot, so bits 0 through 7 are "don't care" bits. Bits 8 through 14 determine the wiper position: bits 8 through 13 set the code, and bit 14 is "mute." (Logic one at bit 14 produces the lowest-possible output current by setting the left side of R5 at approximately 0.599V.) After entering all 16 bits, enter the code and change the brightness level by driving RST-bar high. Figure 2 shows the logarithmic relationship between an LED current and the pot's input code.

Figure 2.  LED current vs. input code for the Figure 1 circuit.
Figure 2. LED current vs. input code for the Figure 1 circuit.

This design idea appeared in the June 10, 2004 issue of EDN magazine.

1.2V Drive 7 High efficiency white LED flashlight


1.2V Drive 7 High efficiency white LED flashlight

High efficiency white LEDs have advanced to the point where they can replace glow bulbs and other light sources not only as indicators, but also for illumination. While many of the claims made about the LEDs’ efficiency, light quality, lifetime and economy are mostly exaggeration, the truth is that for very low light levels they are now competitive. They have equal or slightly higher efficiency than a flashlight bulb, a longer lifetime, and are very much tougher. On the other hand, they are still far more expensive than a bulb, for a given light output.

The circuit is a self-oscillating boost converter, and I certainly cannot claim having invented it. It is ages old! I only did the detail design of this one, and optimized it in the course of one afternoon. It runs with a beautifully clean waveform, with all components except the LEDs staying completely cold to the touch. At this low power level, even that doesn’t guarantee a good efficiency, but I measured it at about 72%, which is quite good for a circuit operating from such a low voltage!

Source :http://ludens.cl/Electron/ledlamp/ledlamp.html

White LED Driver by LT1618


In addition to providing an accurate input current limit, the LT1618 can also be used to provide a regulated output current for current-source applications.

Read more original source:http://www.linear.com

2 Transistor LED Flasher


Transistor Flasher


This is a classic 2 transistor astable multivibrator. Many other NPN small signal or switching transistors can be used, including 2N4401, PN2222 or 2N2222 using the circuit on the left. The circuit can also be inverted using PNP transistors such as 2N3906, 2N4403, PN2907, or 2N2907 as shown to the right. The 470 ohm resistors determine the LED brightness. Lower resistance means higher current, and more light. LEDs that require more current or have a higher operating voltage (such as green and yellow) may work better with 300 ohms.

The RC time constant of the 39K ohms resistor and the 10uF capacitor determines the on time for each side. (The two sides do not need to match - vary the RC time constant for one side to get a lower or a higher duty cycle). With the values shown, the flash rate is about 1 cycle per second at 50% duty cycle.

Build your own LED FLASHER and learn how it works


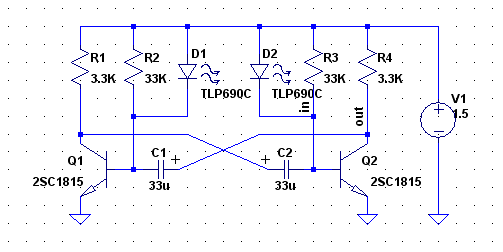
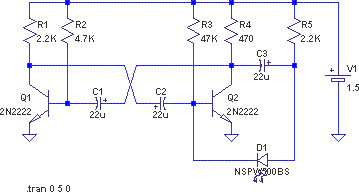
In this project we flash a Light Emitting Diode (LED). The circuit is exactly the same as in project 1 with two additional components - a 10u electrolytic and a 10n capacitor. The 10u changes the operation of the circuit considerably and it's handy we covered the operation of the two transistor section in project 1 in so much detail so all we have to describe is the operation of the electrolytic. 

The electrolytic is a feedback component and we will see how feedback alters the operation of a circuit. 


Project 2 with Touch Plate fitted to PC board

CONSTRUCTION
( ) Fit the 10u electrolytic to the board as shown in the diagram with the positive lead going down the hole marked "+" and the negative lead down the hole next to it.

( ) Fit the 10n capacitor to the holes marked "10n".

Switch the circuit ON and touch the touch plate lightly. The LED will start to flash and as you press harder, the flash rate will increase. 

The HIGH GAIN AMPLIFIER must be built first


The extra parts for the LED Flasher:
1  -  100k resistor (brown-black-yellow-gold)
1  -  10n ceramic capacitor
1  -  10u electrolytic

We have already covered the operation of the two transistors and shown how they create a very high gain amplifier. We also explained how the current through the touch plate is amplified thousands of times by the two transistors and the result is sufficient to turn ON the LED. 

The addition of the capacitor (the electrolytic comes under the broad heading of capacitors, along with greencap, ceramic, monoblock, polyester, styro, mica and others) turns the circuit ON for a very short period of time then off again, and the cycle repeats.
The LED is actually ON for only a very short period of time and your eyes extend the time considerably. This is one of the tricks used in electronics to save energy. Because it is ON for such a short time, the average current taken by the circuit is very small as it only draws current from the battery in very short bursts. The only thing we will be describing in this project is the function of the 10u electrolytic.


HOW THE CIRCUIT WORKS

When the battery is connected, both the transistors are off. When you touch the touch plate, current flows through your finger to charge the 10u electrolytic. The 22R and 47k complete the charge path.
When the voltage on the base of Q1 rises to about .6v, the transistor turns ON and its collector-emitter resistance drops. This resistance is in series with a 1k resistor and they form the base-bias resistor for the PNP transistor. You will notice the PNP transistor and its base-bias resistor (the 1k and collector-emitter resistance of Q1) are inverse to the layout of the NPN transistor, so simply think "up-side-down" and you will understand the PNP version. Current passes through the Light Emitting Diode in the emitter of Q2 and it illuminates.
The current also flows through the 22R resistor and when current flows through a resistor, a voltage is developed across it. This voltage appears on the negative lead of the electrolytic and the electro is "raised up." The positive lead is also raised up by the same amount and the energy that was put into the electrolytic at the beginning of the cycle flows into the base of Q1 to turn it on harder.

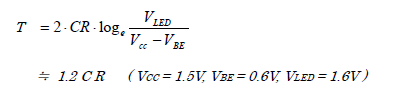
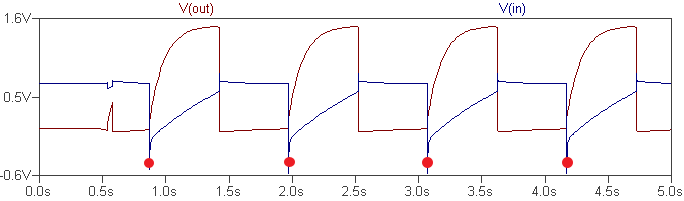
When the two transistors turn on harder the brightness of the LED increases. The voltage across the 22R increases and the electrolytic is raised even higher. This process continues to run around the circuit until both transistors are fully turned on and the electrolytic begins to charge in the forward direction via the base of Q1, the collector-emitter leads of Q2 and the LED. This produces the ON time for the LED and as we mentioned in the section on capacitors, the initial charging current for a capacitor is high and it gradually tapers off as the electro becomes charged. This is what happens in this case and when the capacitor is nearly fully charged, the charging current reduces to a point where Q1 is not turned on as much.

This causes Q2 to turn off slightly and the voltage on the positive lead drops a small amount. The negative lead follows and as we learnt in the section on transistors, when the voltage on the base of a transistor falls below .6v, the transistor does not turn on at all. At this stage in the cycle Q1 turns off more and causes Q2 to turn off also.
A few more decrements and both transistors are fully turned off.

This causes the positive lead of the electrolytic to drop to the level of the negative rail.
The amazing part in this portion of the cycle is the electrolytic is fully charged and since the positive lead drops by about 7v, the negative lead falls by an equivalent amount and so the base of the first transistor sees a negative voltage (-7v!) that keeps it fully turned off. The charge on the electrolytic is gradually neutralised by current flowing through the touch plate and when all the charge is neutralised, the electrolytic begins to get charged in the opposite direction by the same current. The time this takes produces the OFF time for the LED.

The OFF time is considerably longer than the ON time because the current through the touch plate is much smaller than the current through the transistor and LED when charging the electro.

The electrolytic needs to charge to about .6v before the cycle starts again. You will notice the electrolytic has been placed in the circuit "around the wrong way," with the positive lead only 22R away from the negative rail. When the cycle begins, the electro gets charged in the opposite direction to about .6v but later in the cycle it gets charged in the forward direction to about 7v. The electro will accept a small reverse charge without being damaged, provided most of the charging is done in the forward direction.

The operation of the circuit is really quite complex and don't be surprised if you don't understand it fully. Future e-books will go over these building blocks again and bring everything into focus.

EXPERIMENTING
The object of these projects is to carry out as much individual experimenting as you can before going on to the next project. Experiment with different pressures on the touch plate and try other substances such as a slice of fruit or vegetable to see how the conductivity of the each compares with your finger.

You can also try some of the liquids mentioned in Project 1, Question 5, to see how they affect the flash rate. Later, in Project 5 you will be able to test the liquids again with the Siren Circuit and see how much easier it is to work with an audio output to determine the variations in frequency, rather than watching a changing flash rate.

FITTING THE 100k RESISTOR
The touch plate will be required for Project 5 and once you have carried out all the experiments for this project, it can be removed and replaced with a 100k resistor. 

( ) Remove the Touch Plate and leads from the PC board
( ) Fit the 100k (brown-black-yellow-gold) resistor near the Touch Plate symbol.
This will create a fixed flash rate of about one flash per second (1Hz). 

Low Power LED Flasher


It doesn't get much simpler than this circuit. Four components counting the battery!
How can an LED be illuminated by a 1.5V circuit, when the forward voltage of an LED is about 2V? The LM3909 uses the 100uF capacitor as a charge reservoir, building up a voltage of about 2V before discharging the cap through the LED.

This circuit is used in emergency flashlights on airplanes and in other public places. Though you may not have known it till now, the LM3909 is everywhere!

Flasher

Two Transistor LED flasher

image

White LED Lamp


Nowadays you can buy white LEDs, which emit quite a bit of light. They are so bright that you shouldn’t look directly at them. They are still expensive, but that is bound to change. You can make a very good solid-state pocket torch using a few of these white LEDs. The simplest approach is naturally to use a separate series resistor for each LED, which has an operating voltage of around 3.5 V at 20 mA. Depending on the value of the supply voltage, quite a bit of power will be lost in the resistors. The converter shown here generates a voltage that is high enough to allow ten LEDs to be connected in series. In addition, this converter supplies a constant current instead of a constant voltage.

A resistor in series with the LEDs produces a voltage drop that depends on the current through the LEDs. This voltage is compared inside the IC to a 1.25-V reference value, and the current is held constant at 18.4 mA (1.25 V ÷ 68 Ω). The IC used here is one of a series of National Semiconductor ‘simple switchers’. The value of the inductor is not critical; it can vary by plus or minus 50 percent. The black Newport coil, 220 µH at 3.5 A (1422435), is a good choice. Almost any type of Schottky diode can also be used, as long as it can handle at least 1A at 50V. The zener diodes are not actually necessary, but they are added to protect the IC. If the LED chain is opened during experiments, the voltage can rise to a value that the IC will not appreciate.
Resistors:
R1 = 1kΩ2
R2 = 68Ω
Capacitors:
C1 = 100µF 16V radial
C2 = 680nF
C3 = 100µF 63V radial
Inductors:
L1 = 200µH 1A
Semiconductors:
D1 = Schottky diode type PBYR745 or equivalent
D2-D5 = zener diode 10V, 0.4W
D6-D15 = white LED
IC1 = LM2585T-ADJ (National Semiconductor)

LED torch using MAX660


This entry was posted on Saturday, November 13th, 2010 at 8:11 am and is filed under LED Flasher, Lighting. Both comments and pings are currently closed.

This is a simple LED torch circuit based on IC MAX660 from MAXIM semiconductors. The MAX 660 is a CMOS type monolithic type voltage converter IC. The IC can easily drive three extra bright white LEDs.The LEDs are connected in parallel to the output pin 8 of the IC. The circuit has good battery life. The switch S1 can be a push to ON switch.

Novel white LED torch


Although this design is reproduced directly from the manufacturer’s datasheets, its use in this application is rather novel. Originally intended for high-visibility LED bargraph readouts, here the LM3914 is used as the basis of a 10-step variable brightness current-regulated white LED torch!

Click for larger image

The circuit has only four components in the control and regulation circuit: R1, R2, VR1 and the LM3914. The circuit can be built directly on the pins of the LM3914 to produce a package not much bigger than the LM3914 itself.

The LM3914 is set to operate in bargraph mode so that the LEDs light progressively as its input signal increases. This signal comes from the wiper of VR1, which provides a variable voltage between 0V and the supply voltage to pin 5 of the LM3914.

The internal resistor ladder network of the LM3914 has its low end (pin 4) connected to ground and the high end (pin 6) connected to the supply voltage via R2. The purpose of R2 is to give LED 10 a clear turn-on zone. Resistor R1 (620Ω) on pin 7 of IC1 sets the current through each LED to about 20mA.

As VR1 is rotated from the 0V position (all LEDs off) to the supply voltage position (all LEDs on), the LEDs will progressively light. With all LEDs off, the circuit will draw about 5mA. With all LEDs illuminated, it will draw about 205mA and dissipate 307mW with a 4.5V supply.

(Editors note: these are nominal figures only. Actual device dissipation will depend entirely on the input voltage and LED forward voltage.

In use, we recommend that a resistor (R3) be inserted in series with the positive supply, chosen so that the LM3914’s dissipation is limited to about 500mW. Typically, this would be needed for supply voltages of 6V and higher. The inclusion of the resistor necessitates a 10μF decoupling capacitor across the supply rails.)

By carefully selecting the LEDs, this torch can be as bright as 15,0000mCd while costing less than $20.

Mick Stuart,

Lambton, NSW