Wednesday, February 16, 2011

LM3909 LED Flasher

The LM3909 is an integrated circuit (IC) which will flash a light-emitting diode (LED). Using only two extra components and a battery, the circuit is cheap and has a very low current drain from a 1.5 V cell. The circuit can be used as a novelty flasher, an indicator for a dummy alarm bell box, or it could be attached to a torch so that it could be found easily in the dark! The simple circuit is shown in Figure

image

LED FLASHER WITH ONE TRANSISTOR!

LEDflasher-1Tr
This is a novel flasher circuit using a single driver transistor that takes its flash-rate from

Flasher-1Tr

a flashing LED. The flasher in the photo is 3mm.  An ordinary LED will not work. The flash rate cannot be altered by the brightness of the high-bright white LED can be adjusted by altering the 1k resistor across the 100u electrolytic to 4k7 or 10k. The 1k resistor discharges the 100u so that when the transistor turns on, the charging current into the 100u illuminates the white LED. If a 10k discharge resistor is used, the 100u is not fully discharged and the LED does not flash as bright. All the parts in the photo are in the same places as in the circuit diagram to make it easy to see how the parts are connected.

FLASHING TWO LEDS


These two circuits will flash two LEDs very bright and consume less than 2mA average current. They require 6v supply. The 330k may need to be 470k to produce flashing on 6v as 330k turns on the first transistor too much and the 10u does not turn the first transistor off a small amount when it becomes fully charged and thus cycling is not produced.
LED_Flasher_2LEDs

3v WHITE LED FLASHER

3vWhiteLEDflasher


This will flash a white LED, on 3v supply and produce a very bright flash. The circuit produces a voltage higher than 5v if the LED is not in circuit but the LED limits the voltage to its characteristic voltage of 3.2v to 3.6v.   The circuit takes about 2mA an is actually a voltage-doubler (voltage incrementer) arrangement. Note the 10k in series with the LED charges the 100u. It does not illuminate the LED because the 100u is charging and the voltage across it is always less than 3v. When the two transistors conduct, the collector of the BC557 rises to rail voltage and pulls the 100u HIGH. The negative of the 100u effectively sits just below the positive rail and the positive of the electro is about 2v higher than this. All the energy in the electro is pumped into the LED to produce a very bright flash.

5-LED CHASER

5-LED-Chaser

The LEDs in this circuit produce a chasing pattern similar the running LEDs display in video shops. All transistors will try to come on at the same time when the power is applied, but some will be faster due to their internal characteristics and some will get a different turn-on current due to the exact value of the 22u electrolytics. The last 22u will delay the voltage-rise to the base of the first transistor and make the circuit start reliably.
The circuit can be extended to any number of odd stages.

AUTOMATIC GARDEN LIGHT

AutoGardenLight

This circuit automatically turns on and illuminates the LEDs when the solar panel does not detect any light. It switches off when the solar panel produces more than 1v and charges the battery when the panel produces more than 1.5v + 0.6v = 2.1v

BUCK CONVERTER for HIGH-POWER LED 210mA


image

This circuit  will drive 1 high-power white LED from a 12v supply and is capable of delivering 210mA. The driver transistor is BD 139 and the details of the inductor are shown above. The voltage across the LED is approx 3.3v - 3.5vThe driver transistor will need a small heatsink. The 2R2 can be increased if a lower drive-current is required.

BUCK CONVERTER for HIGH-POWER LED 48mA to 90mA

image

This circuit is a "Buck Converter" meaning the supply is greater than the voltage of the LED. It will drive 1 high-power white LED from a 12v supply and is capable of delivering 48mA when R = 5R6 or 90mA when R = 2R2.

The LED is much brighter when using this circuit, compared with a series resistor delivering the same current. But changing R from 5R6 to 2R2 does not double the brightness. It only increases it a small amount.

The inductor consists of 60 turns of 0.25mm wire, on a 15mm length of ferrite rod, 10mm diameter.   Frequency of operation: approx 1MHz. The circuit is not designed to drive one 20mA LED.This circuit draws the maximum for a BC 338

LED TORCH with ADJUSTABLE BRIGHTNESS

image

This circuit will drive up to 3 high-bright white LEDs from a 3v supply. The circuit has a pot to adjust the brightness to provide optimum brightness for the current you wish to draw from the battery.

The transformer is wound on a ferrite slug 2.6mm dia and 6mm long as shown in the LED Torch with 1.5v Supply project.

This circuit is a "Boost Converter" meaning the supply is less than the voltage of the LEDs. If the supply is greater than the voltage across the LEDs, they will be damaged.

1v5 WHITE LED DRIVER

1v5WhiteLEDDriver

This circuit will drive a super-bright white LED from a 1.5v cell. The 60 turn inductor is wound on a small ferrite slug 2.6mm dia and 6mm long with 0.25mm wire.

The main difference between this circuit and the two circuits above is the use of a single winding and the feedback to produce oscillation comes from a 1n capacitor driving a high gain amplifier made up of two transistors.

The feedback is actually positive feedback via the 1n and this turns on the two transistors more and more until finally they are fully turned on and no more feedback signal is passed though the 1n. At this point they start to turn off and the signal through the 1n turns them off more and more until they are fully turned off. The 33k turns on the BC557 to start the cycle again.

3-Inductors
If you do not have a ferrite slug, the inductor can be made from a machine screw 10mm long and about 3-4mm dia. Wind 150 turns of 0.25mm wire. Or you can use a brass ferrule 20mm long x 5mm. Wind 150 turns.
RESULTS for the same brightness:
Slug:                   21mA
Brass Spacer:     18mA
Machine screw:  14mA

WHITE LED FLASHER


image

This  circuit will flash a super-bright white LED from a 1.5v cell. The transformer is wound on a small ferrite slug 2.6mm dia and 6mm long as shown in a project above. The circuit uses the zener characteristic of the reverse-base-emitter junction of a BC 547 to pass current and flash the LED.

LED TORCH with 1.5v SUPPLY

image


This simple circuit will illuminate a super-bright white LED to full brightness with 28mA from a 1.5v cell. The LED is 20,000mcd (20cd  @ 15° viewing angle) and has an output of approx 1lumen.

The transformer is wound on a small ferrite slug 2.6mm dia and 6mm long. It is made from F29 ferrite material as the circuit operates at a high frequency (100kHz to 500kHz).
The efficiency of the circuit revolves around the fact that a LED will produce  a very high output when delivered pulses, but the overall current will be less than a steady DC current.

BC 337 has a collector-emitter voltage of 45v. (BC338 has 25v collector-emitter voltage rating.) The voltage across the transistor is no more than 4v as the LED absorbs the spikes. Do not remove the LED as the spikes from the transformer will damage the transistor.   The circuit will drive 1 or 2 while LEDs in series.

Low-battery indicator with LED flasher

Low battery indicator with LED flasher

Typical low-battery indicators simply turn on an LED when the battery voltage drops below a certain value. Such circuits actually accelerate the battery’s extinction by drawing excessive current. This circuit draws a mere 1 mA in its standby mode and averages only 20 m A when activated. The low current imposes a minimal burden on any battery circuit.

Diac controlled LED flasher


This is probably the simplest idea to generate flashing light from an LED using AC. The circuit is relatively the simple way of flashing one or more LEDs from a high voltage DC obtained from Mains. This can be used as a Mains indicator or Mock flasher.

The circuit uses a diac for the alternate switching of LED. The diac is usually used in pulse generator circuits to trigger SCR and Triac. If a low voltage passes through a diac, it simply behaves like an open circuit and only very low current passes through it. But if the voltage increases to the breakdown threshold of the diac, it will pass heavy current. Usually 35 volt DC is required to attain the threshold level of diac. Unlike SCR, diac conduct in both the directions. In the circuit, a commonly available DB3 diac is used. Diode D1 rectifies AC and generates a high volt DC. Resistor R1 safely controls the DC to operate diac and LED.

Normally LED will be OFF. When the capacitor charges fully, diac gets the threshold voltage and fires. This provides current to LED and it lights. Resistor R2 makes the LED current to a safer value of 30 mA. When the diac conducts, C1 discharges and again the breakdown voltage of diac decreases and LED turns off. Thus the charging/discharging cycles of C1 makes the LED flashing. The value of C1 determines the flash rate. Higher values give slow flash rate and vice versa. If the threshold level of diac is not obtained using the given value of R1, reduce it to 10K, but its wattage should be increased to 5 watts.

Caution: The circuit is directly connected to high volt AC and there is no galvanic isolation. Take utmost care while handling the circuit. Enclose it in a shock proof case. Do not touch any points when it is connected to Mains.

Diac controlled Flasher Circuit

Diac controlled LED Flasher

Read more: http://electroschematics.com/4488/diac-controlled-led-flasher-3/#ixzz1E7NHiqF9

4017 Led Pattern-Flasher


4017 Led Pattern-Flasher

The circuit uses a 555 timer oscillator to supply clock pulses of a variable frequency to the 4017 decade counter. The decade counter only needs to have three outputs so the fourth output goes into the reset pin to start the cycle all over again. The central red led is always on. Each row of four leds flash in sequence giving the impression that the light is rotating. It is an idea that works very well giving an eye-catching display. It will run continuously for three hours with a standard pp3 battery.

Read More Source:http://www.geocities.com/electronics3456/4017.html

12 LED Flasher


     LED flasher in this circuit use 12 LED it can show 2 style .The circuit consist 2 section

1.pule generate circuit

2.Counter-Display circuit


Figure 1. Schematics of 12 LED Flasher

THE FLIP FLOP

This is the simplest circuit capable of alternately flashing two LEDs. The flash-rate is determined by the two 10k resistors and two 100u electrolytics. The flash-rate can be increased or decreased and one LED can be made to flash brighter by altering the 4 components.


The operation of the circuit is fully discussed in the Basic Electronics Course P17 & P19 (subscription needed) and in 5 Projects P16. (use this link for the web: 5 Projects)
It can be purchased as one of the kits in 5 Projects. (use this link for the web: 5 Projects)
This circuit does not have the advantage of the two described above. It does not pulse the LED with a high current for a short period of time and thus it is not as efficient as the two above. When a LED is pulsed with a high current for a very short period of time, the output is almost as bright as a constant, lower-current.


THE FLIP FLOP

Here are some Flashing LED circuits from "200 Transistor Circuits' eBook. The first 4 circuits show how to change an NPN transistor for PNP.

1.5v LED FLASHER


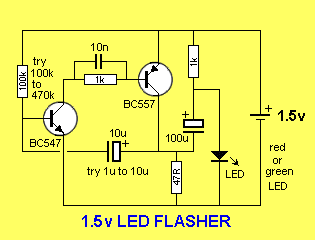
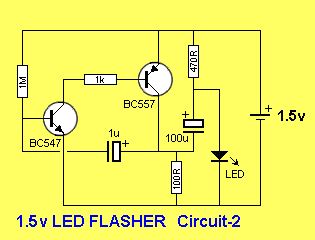
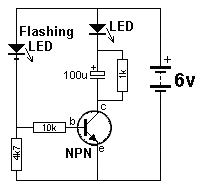
The next circuit flashes a LED and uses a 1.5v supply. The LED does not turn on via the 1k resistor because the characteristic voltage of a LED is between 1.7v and 2.3v, (depending on the colour).  It turns on when the 100u is "jacked up" by the collector of the BC557.

The circuit is a charge-pump design. This is where a capacitor (electrolytic) is allowed to charge and is then raised higher and allowed to discharge into a load. The load sees a voltage that can be higher than the supply.

The two transistors operate as a high-gain amplifier with the output being the 47R. The cycle starts with the first transistor being turned on via the 100k. This action also charges the 10u until 0.75v appears on the base of the transistor.

This turns on the second transistor and the negative end of the 10u is raised when the BC557 turns on. This raises the positive end of the 10u and the first transistor turns on even more. This action continues until the first transistor is fully turned on and the BC557 is fully turned on. The voltage across the collector-emitter terminals of the BC557 will be small and about 1v will appear across the 47R. This voltage "jacks up" the 100u and since it is fully charged via the 1k resistor, it will present a voltage of about 2.5v to the LED. Any voltage over 1.7v will turn on a red LED and a green LED will turn on at 2.3v. The energy in the 100u is now passed to the LED to illuminate it.

The flash is very brief due to the operation of the two-transistor amplifier. Although the energy in the 100u will produce a brief flash, the timing of the two transistor circuit is even faster and it provides the duration. The actual duration of the flash depends on the time the two transistor amplifier can be in a fully turned-on state. This is governed by the charging of the 10u electrolytic.

When the base of the first transistor sees 0.7v, the two transistors start to turn on by a process called REGENERATION. This is explained further in our article: REGENERATION, in Circuit Tricks. Regeneration is a condition where a circuit turns on more and more without any external assistance.

The 10u is "jacked up" by the BC557 turning on and it delivers a current to the base of the BC547. Initially it delivers its energy to the base but very soon is is higher than 0.7v and it is fully discharged. The electrolytic now starts to charge in the reverse direction and this process continues to keep the BC 547 turned on. It charges very quickly in the reverse direction as the charging path is the emitter-collector junction of the BC557 and base-emitter junction of the BC547. When it is nearly charged, the current-flow reduces and this turns off the BC547 very slightly. This turns off the BC557 slightly and the 10u is "lowered." This puts less "turn-on" on the BC547 and the two transistors start to turn off very quickly.

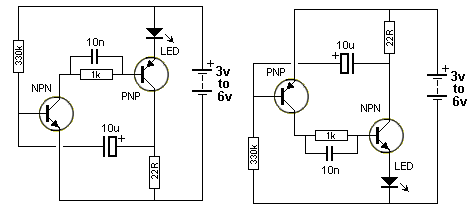
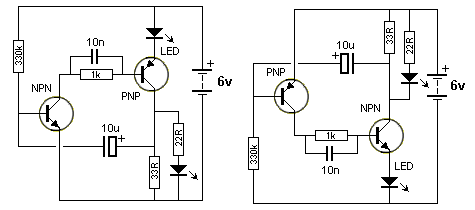
The 10u is now charged in the reverse direction and a negative voltage is presented to the base of the first transistor. This voltage is is gradually reduced by the electrolytic charging via the 100k and that's why the circuit has a very long off cycle.Two circuits are shown. They use slightly different components to produce the same results.

The only critical value is the 100R. The circuit will not work with a value higher than about 150R. It needs a low value so the BC557 transistor is turned on to a high level before a voltage is developed across the 100R. If the value is too high, a voltage will be developed across this resistor when the BC557 is turned on a small amount and this voltage will be sent to the BC547 to turn it on too. The two transistor will sit in a conditions that they are both turned on and the circuit will freeze.

The circuit has to function such that the BC547 is turned on to its maximum when the electrolytic is pulled HIGH. This transistor will now be turned on by the current delivered by the 100k (or 1M) plus the charging current of the electrolytic.  As the electrolytic charges, the current into the base of the BC547 will fall and the transistor will turn off slightly. This slight turn-off must be passed to the BC557 to turn it off slightly too and lower the "turn-on" effect of the electrolytic. It is the 47R (or 100R) that is pulling the electrolytic down to the 0v rail and if this resistor does not have sufficient "pull-down" effect, the cycle will not continue. When this resistor has a low value, the BC557 must deliver a high current and it must be turned on via a proportionally high current into the base. This current comes from the BC547 and it needs a proportionally high current into its base to provide this condition. We are only talking about fractions of milliamps and microamps, but these conditions must be met for the circuit to work.

3v Low Battery Voltage Flasher Circuit


Many battery powered devices use two AA alkaline cells.  Often you will not know when it is time to replace the batteries until the device powered by them actually stops operating.  The hobby circuit below can be connected to a 3v battery, to give you some warning when the battery is nearing its end of life.  It will flash a LED when the battery voltage drops to about 2.4 volts.  The electronic circuit draws only 1ua of current in standby mode and jumps to only 20ua when flashing, so it can safely be included without depleting the battery energy.  A voltage detector IC from Panasonic (Microchip also makes similar devices) is used to monitor the battery voltage.  The device’s open drain output swings low, when the battery voltage is below 2.4 to 2.5 volts.  This action turns on the two transistor oscillator circuit, which drives the LED with short current pulses lasting only 2ms.  I published this Flasher circuit in the January 2 issue of EDN magazine in 1997.

Click on Schematic below to view PDF version of this Circuit

Circuit Circuit Under Voltage LED Flasher Circuit designed by David Johnson, P.E. (Dec 24, 1998)

1.5 V LED Flasher

Many published circuits that flash LEDs need 3 volts or more. This circuit uses only a single inexpensive C-MOS IC and flashes the LED for a full year on a single 1.5 volt AA alkaline battery cell. The circuit uses a charge pump technique to provide the LED the needed voltage.

Circuit 1.5 LED Flasher Circuit, version A designed by Dave Johnson, P.E. (June 4, 2000)